Costco’s chicken pot pie stands out as one of the warehouse giant’s most popular comfort foods. The secret to its perfect golden-brown crust and creamy filling lies in the cooking technique.
The right cooking instructions make a huge difference when you prepare Costco’s classic chicken pot pie or their other savory varieties. I’ve prepared countless pot pies as a chef, and I’ll show you exactly how to take your Costco pot pie from frozen to perfectly baked.
This detailed guide will give you everything about cooking your Costco pot pie. You’ll discover the right equipment, preparation steps, and solutions to common problems. The guide includes precise temperature settings, timing guidelines, and food safety measures that guarantee delicious results every time you bake.
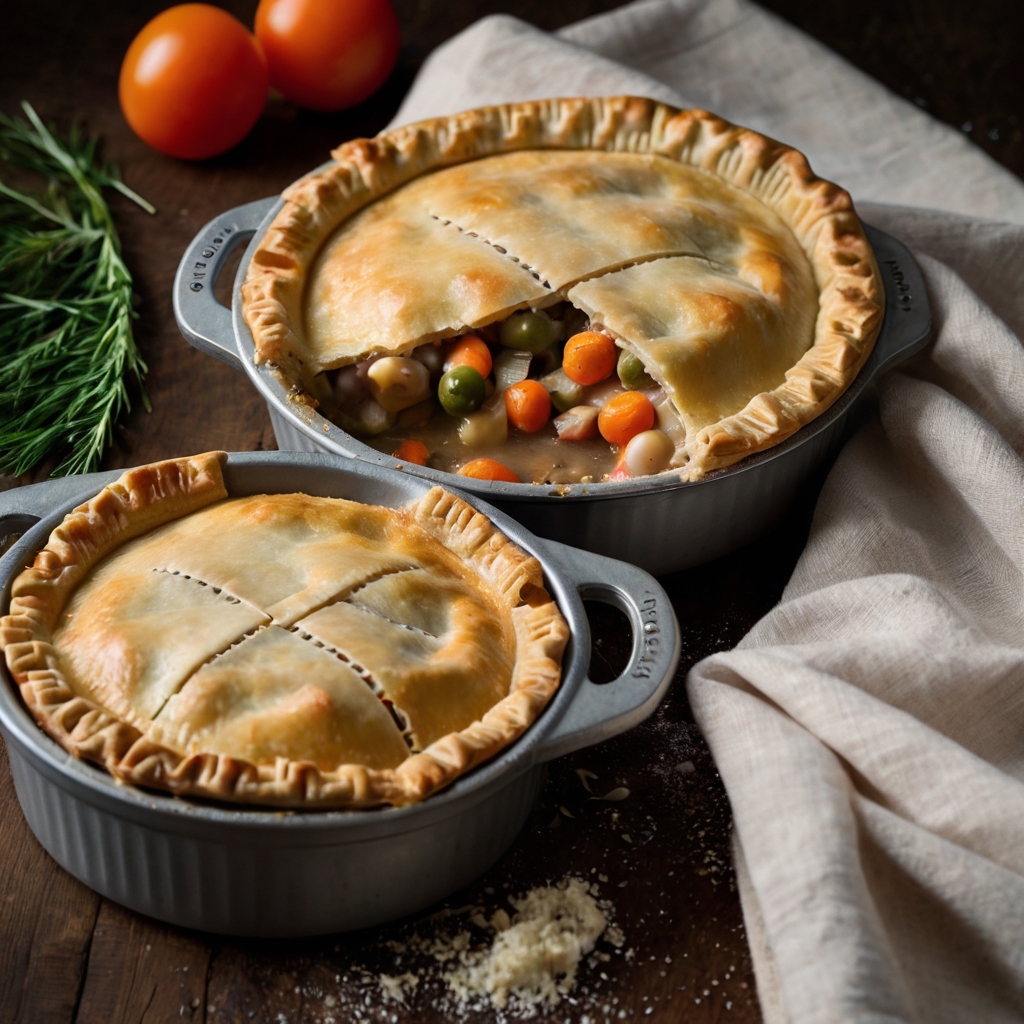
Table of Contents
- 1 Essential Equipment and Preparation
- 2 Step-by-Step Cooking Instructions
- 3 Troubleshooting Common Issues
- 4 Adjusting for Different Ovens
- 5 Food Safety Guidelines
- 6 Here are some FAQs about the Costco pot pie cooking instructions:
- 6.1 How long do you cook the chicken pot pie from Costco?
- 6.2 How do you heat up a Costco chicken pot pie?
- 6.3 How do you heat a frozen chicken pot pie in the oven?
- 6.4 How to cook banquet pot pies?
- 6.5 How long does it take to heat up a Costco pie?
- 6.6 How do you know when frozen chicken pot pie is done?
- 6.7 What temperature do you cook a homemade chicken pot pie at?
- 6.8 Are chicken pot pies healthy?
- 6.9 Is Costco chicken pot pie seasonal?
- 6.10 How many people does a Costco pot pie feed?
- 6.11 How long will a Costco pie last?
- 6.12 Do chicken pot pies get old?
Essential Equipment and Preparation
Getting your Costco pot pie ready is a vital step to achieve perfect results. Let’s get everything ready before we start cooking.
Required baking tools and equipment
You’ll need these items to cook your Costco pot pie:
- A large baking sheet (at least 16×16 inches)
- Heavy-duty aluminum foil
- Meat thermometer
- Sturdy oven mitts
- Optional: Egg wash brush to give a golden finish
Proper thawing methods
Here are three reliable ways to thaw your Costco pot pie:
Refrigerator Method (Recommended) The best results come from thawing your pot pie in the refrigerator overnight. This takes about 24 hours but will give a consistent thaw and keeps food safe. Just put the pie on a plate to catch any drips.
Cold Water Method When time is short, you can submerge the sealed pie in cold water. Change the water every 30 minutes. Small items usually thaw in 1-2 hours. You must cook the pie right after it thaws with this method.
Microwave Method Microwave thawing should be your last choice. This method requires immediate cooking after thawing. Use your microwave’s defrost setting and check frequently to avoid partial cooking.
Preparing your oven for optimal results
Your oven rack should sit in the bottom third of the oven for even heat distribution. A vital step: Get your oven hot at 375°F (190°C) before you begin. This heat cooks both filling and crust perfectly.
Take off both the plastic lid and base completely before baking. Set your pot pie on a sturdy baking sheet to catch any overflow while cooking. Frozen pies need longer cooking times, so keep aluminum foil handy to prevent the crust from getting too brown.
Pro Tip: Make sure there’s enough space between your pie and the upper heating element to prevent uneven cooking or burning.
Step-by-Step Cooking Instructions
These steps will help you make that perfectly cooked Costco pot pie you’ve been craving. My experience as a professional chef has helped me create reliable instructions that work every time.
Temperature and timing guidelines
The right temperature setting makes all the difference. Your oven should be preheated to 375°F (190°C). Here’s a simple timeline that works:
- Place your pot pie on a baking sheet
- Cover completely with aluminum foil
- Bake for 50 minutes with foil
- Remove foil and continue baking for 5-10 minutes
- Let rest for 15-20 minutes before serving
Covering and uncovering techniques
A perfect Costco pot pie depends on how well you cover it with foil. The foil should completely cover the pie during the first baking phase. This vital step keeps the top from burning and allows the filling to heat evenly. You can create a protective foil ring around just the crust if the edges start browning too quickly.
You have two options to get an extra-crispy top crust:
- Remove the foil completely during the final 5-10 minutes of baking
- Brush the top with beaten egg before baking to get a boosted golden finish
Testing for doneness
Your pie needs specific temperatures for safety and best taste. The center should read 165°F (74°C) minimum on a meat thermometer. Test multiple spots to make sure it heats evenly.
Watch for these signs that your pie is done:
- Golden brown crust with a flaky appearance
- Bubbling filling visible around edges
- Firm, set filling when tested with a knife
The pie might need more time in some ovens. Add 5-minute intervals if needed, but watch carefully to prevent over-browning. Note that oven times may vary, but the internal temperature requirement stays the same.
Pro Tip: Brush the crust with melted butter in the final few minutes. This simple trick gives your Costco pot pie a beautiful golden finish that looks like it came from a fancy bakery.
Troubleshooting Common Issues
Even skilled home cooks run into problems with their Costco pot pie. Here are the biggest problems you might face and the quickest ways to fix them.
Dealing with uneven cooking
Your Costco pot pie might cook unevenly, but proper positioning and rotation will solve this. The pie needs to rotate halfway through baking to distribute heat evenly. You’ll get crispy results by placing the pie in the oven’s center without other dishes crowding it.
Temperature Adjustment Tip: Some cooks get better results at 475°F for even cooking. But if you try this, watch the crust closely and adjust your cooking time.
Preventing soggy bottom crust
Nobody wants a soggy bottom crust. These expert tricks will help:
- Put the pie on the bottom oven rack
- Raise your baking temperature to 400°F to crisp the bottom
- Make sure the oven is hot enough before adding the pie
- Give your pie 15 minutes to rest after baking
Pro Tip: A stubborn underbaked bottom crust needs 5 extra minutes in the oven. Just protect the top with foil.
Fixing burnt edges
Burnt edges happen a lot but you can stop them. Your pot pie’s edges are thinner than the center and might burn before everything cooks through. Here’s what to do:
- Use Foil Protection: Start with aluminum foil covering the edges. This lets the middle cook while keeping the edges safe.
- Timing is Everything: Keep the foil on until the last 10-20 minutes of baking. This helps reach the needed 165°F inside while giving you a golden crust.
The moment you see edges getting too brown, make a foil tent. This simple fix saves your pie and makes sure the filling heats properly.
Temperature Check: Note that ovens heat differently. If your edges always burn, drop the temperature by 25 degrees and bake a bit longer. This gentle approach gives you better browning and tastier results.

Adjusting for Different Ovens
Your oven’s unique characteristics play a vital role to become skilled at preparing Costco pot pies. Different ovens can affect your cooking results a lot, as I learned from my experience as a professional chef.
Conventional vs convection settings
Your oven type determines your cooking approach. A convection oven needs a temperature reduction of 25°F (from 375°F to 350°F). The fan-assisted heating creates more even cooking because of continuous air circulation.
Standard 375°F settings work best for conventional ovens. Heat sources cycle on and off to maintain temperature, and these cycles create gentle air currents that affect cooking time and consistency.
Key temperature adjustments:
- Conventional Oven: 375°F for 60-75 minutes
- Convection Oven: 350°F for 50-65 minutes
- Fan-Assisted Models: Expect faster cooking times due to improved heat distribution
Position rack placement tips
Rack placement can make your pot pie succeed or fail. The baking rack should sit about one-third down from your oven’s top. This spot gives the best heat distribution and creates that perfect golden-brown crust while cooking the filling completely.
Convection ovens offer more flexibility with rack placement because of multi-directional airflow. The pie should not sit too close to either the top or bottom heating elements to avoid uneven cooking.
Temperature calibration guidance
These calibration guidelines will help perfect your Costco pot pie:
Start at the recommended temperature and watch your pie’s progress. Uneven cooking or longer cooking times might need adjustments. Some bakers achieve success with higher temperatures – up to 400°F for conventional ovens – but watch carefully for over-browning.
Critical Temperature Checkpoints:
- Your pot pie must reach an internal temperature of 165°F
- Check multiple spots in the pie to ensure even heating
- Use a reliable meat thermometer to get accurate readings
Low-sided pans work best in convection mode by letting heated air flow around your pot pie. This creates even cooking from all angles.
Note that dark or dull-colored baking pans absorb more heat and create a browner, crisper crust. You might need to lower your oven temperature slightly with these pans to prevent over-browning.
Food Safety Guidelines
Food safety should be your top priority as you prepare your Costco pot pie. Let me guide you through everything you need to know about safety measures that will make your pot pie both delicious and safe to eat.
Safe internal temperature requirements
The golden rule of pot pie safety lies in reaching the right internal temperature. Your Costco pot pie needs to hit a minimum internal temperature of 165°F (74°C) throughout. This isn’t optional – it’s a must for food safety.
Here’s how to check the temperature:
- Push the thermometer right into the pie’s center
- Take readings from several spots, especially the middle
- The filling and crust must both hit the minimum temperature
- Let the thermometer reading stabilize
Proper storage before cooking
Your uncooked Costco pot pie needs the right storage conditions to stay fresh and safe. You can keep the pot pie in your refrigerator until the “best before” date on the package. The freezer gives you more time to store it.
Here’s how long your uncooked pot pies last:
- Refrigerated: Up to 7 days from packaging date
- Frozen: Up to 3-6 months if frozen before the sell-by date
- Room temperature: No more than 1-2 hours
Handling leftovers safely
The right way to handle leftovers lets you enjoy your Costco pot pie for several days after cooking. A cooked pot pie stays good in the refrigerator for 3-5 days. Here’s what you need to know about leftovers:
- Original Storage: Get those leftovers in the fridge within 2 hours of cooking
- Packaging: Use a covered dish or wrap it tight with plastic wrap
- Freezing Option: Keeps well frozen for 2-6 months after cooking
- Reheating Safety: Heat everything back up to 165°F
- Portion Control: Cut into individual portions before freezing makes life easier
Your oven works best for reheating at 350°F for 20-25 minutes. A foil cover on the edges stops over-browning while the center heats up properly. Individual portions work in the microwave, but your crust might not stay crispy.
Pro Tip: Wrap your uncooked pot pie in foil and pop it in a freezer bag for the best results. This double protection keeps freezer burn away and maintains quality.
These safety guidelines protect you and your family while you enjoy your Costco pot pie. The right temperature and storage give you both safety and great taste.
The preparation of a Costco pot pie may seem complex initially, but these detailed instructions will make the process simple and rewarding. The right temperature settings, timing guidelines, and safety protocols will help you achieve a golden-brown crust and piping hot filling.
Note that ovens behave differently, so you can make small adjustments to these guidelines while maintaining the significant 165°F internal temperature requirement. Your patience will reward you with a delicious, restaurant-quality pot pie that’s both safe and satisfying.
These techniques ensure your Costco pot pie meets your expectations when you cook for family dinner or prepare comfort food. Keep this piece handy and become skilled at pot pie preparation. This beloved comfort food will soon become your signature dish.